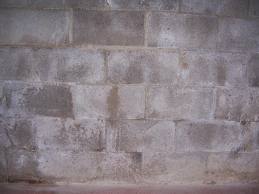
When I think about urban environments, the first thing that comes to my mind is greyness. Where this color comes from, somebody would ask. And then the images start to appear into my head - pavements, architectural structures, and roads, parking structures, block walls and gates. All of the above have something in common --concrete.
Concrete is a construction material, used widely nowadays. At this point, I will not explain the long history of concrete from Egyptian and Roman times, but in my view it is time to integrate more nature into urban areas. This could be accomplished by adding more vegetation into existing architectural systems, and with that many environmental problems could be resolved.
Green roofs, living walls and structures are becoming more popular over time, and the benefits of having them are: reducing noise pollution, urban heat, air pollution, runoff quantity, and increasing carbon sequestration. Moreover, they contribute to cooling, insulation and energy efficiency of the buildings.
Top left: Detail of Louis G. Leroy's Eco-Cathedral.
Top right: Stacked wall of bricks, tiles and clay pipes, with sedums growing along the top. Oase Garden, Holland.
Bottom left: Stacked walls of reclaimed paving slabs create a sunken garden.
Bottom right: Dry stacked retaining walls optimize opportunities for growing alpines. Design by Wolfram Kircher.
 |
Drawing by Swedish green-roof company VegTech |
 |
Inspiration that I found after the studio was over;
a gabion wall by Cuckoo Farm Studios in Essex |
 |
| Grass Spills planter by Sean Martindale |
The Idea
 |
Steps that I followed to build my project:
1. First "L" side made by concrete.
2. Attaching the hardware cloth during the pouring process of #1.
3. Second "L" side made by concrete with attaching #1 and #2.
4. Gabion basket made by wire mesh.
5. Clothing the interior sides with pressed coco fibers.
6. Inserting soil into the basket.
7. Planting and inserting the basket into the "L" structure.
Note: Planting seeds is the most appropriate method of propagation in this structure. |
The idea that I had in my mind was to create a structure that can be freestanding or stacked into a modular wall system. The final product that I made could be used with interlocking, dry stacked precast concrete blocks of varying dimensions. Using the shape of letter “L”, a combination of concrete, wire mesh, coco fibers and soil, I created a small prototype of a gabion structure. This structure is very simple and easy to be built. It consists of two parallel “L”-shaped concrete walls attached to each other perpendicularly with hardware cloth. Inside of the structure is expletive a small gabion, made by wire mesh. The interior walls of the “gabion basket” are clothed with pressed coco fibers, which supposed to hold the soil and water capacity.
The Process
The Final Product
Finally, I created two small structures that could be arranged in a different way to create varied forms. Vegetation will be able to grow all the way from one module to another one and spread through the plant's root system.
Future Applications
I see the combination of the concrete and vegetation into creation of walls, benches, lights and freestanding sculptures. This would add more GREEN color to the greyness….


 Based on the dimensions created in Rhino I then cut the needed pieces out of three 4' x 8' sheets of OSB (waferboard), painted/sealed them with an oil-based primer, and assembled the final mold with 1 1/4" screws.